No Cheese Pasta

Parmigiana, pecorino, Ricotta…. can there be a pasta dish without these meltingly rich cheeses? Seems at this end of the world… in a small town, far, far away from the land of Pastas and Pizzas, when the yearning strikes for a delectable pasta dinner, this is what one does. Thrissur, for that matter is not that proverbial ‘back of beyond’ place … we do get our fair share of common cheeses like Cheddar and Mozzarella, but in the middle of a strict lockdown getting some is just wishful thinking.So here I am, ready to work my magic in the kitchen….throw into my bubbling cauldron on fire, ingredients from the dark interiors of my fridge, shake everything around with a glitter in my eye and a vicious cackle escaping my lips and finally pull out the rabbit, err, my delicious dish of silky white sauce coated homemade pasta.

When it comes to pasta making I have a-trick or two up my sleeve…. a quick lesson of making fresh pasta strips from plain flour learnt during a visit to Tuscany comes in handy. Also some sneak ideas snatched from the mouths of stiff lipped home chefs who guard their secret recipes like their best silver, but blurt out handy tips during moments of bubbly elation at the heights of appreciation for their wondrous culinary skills.

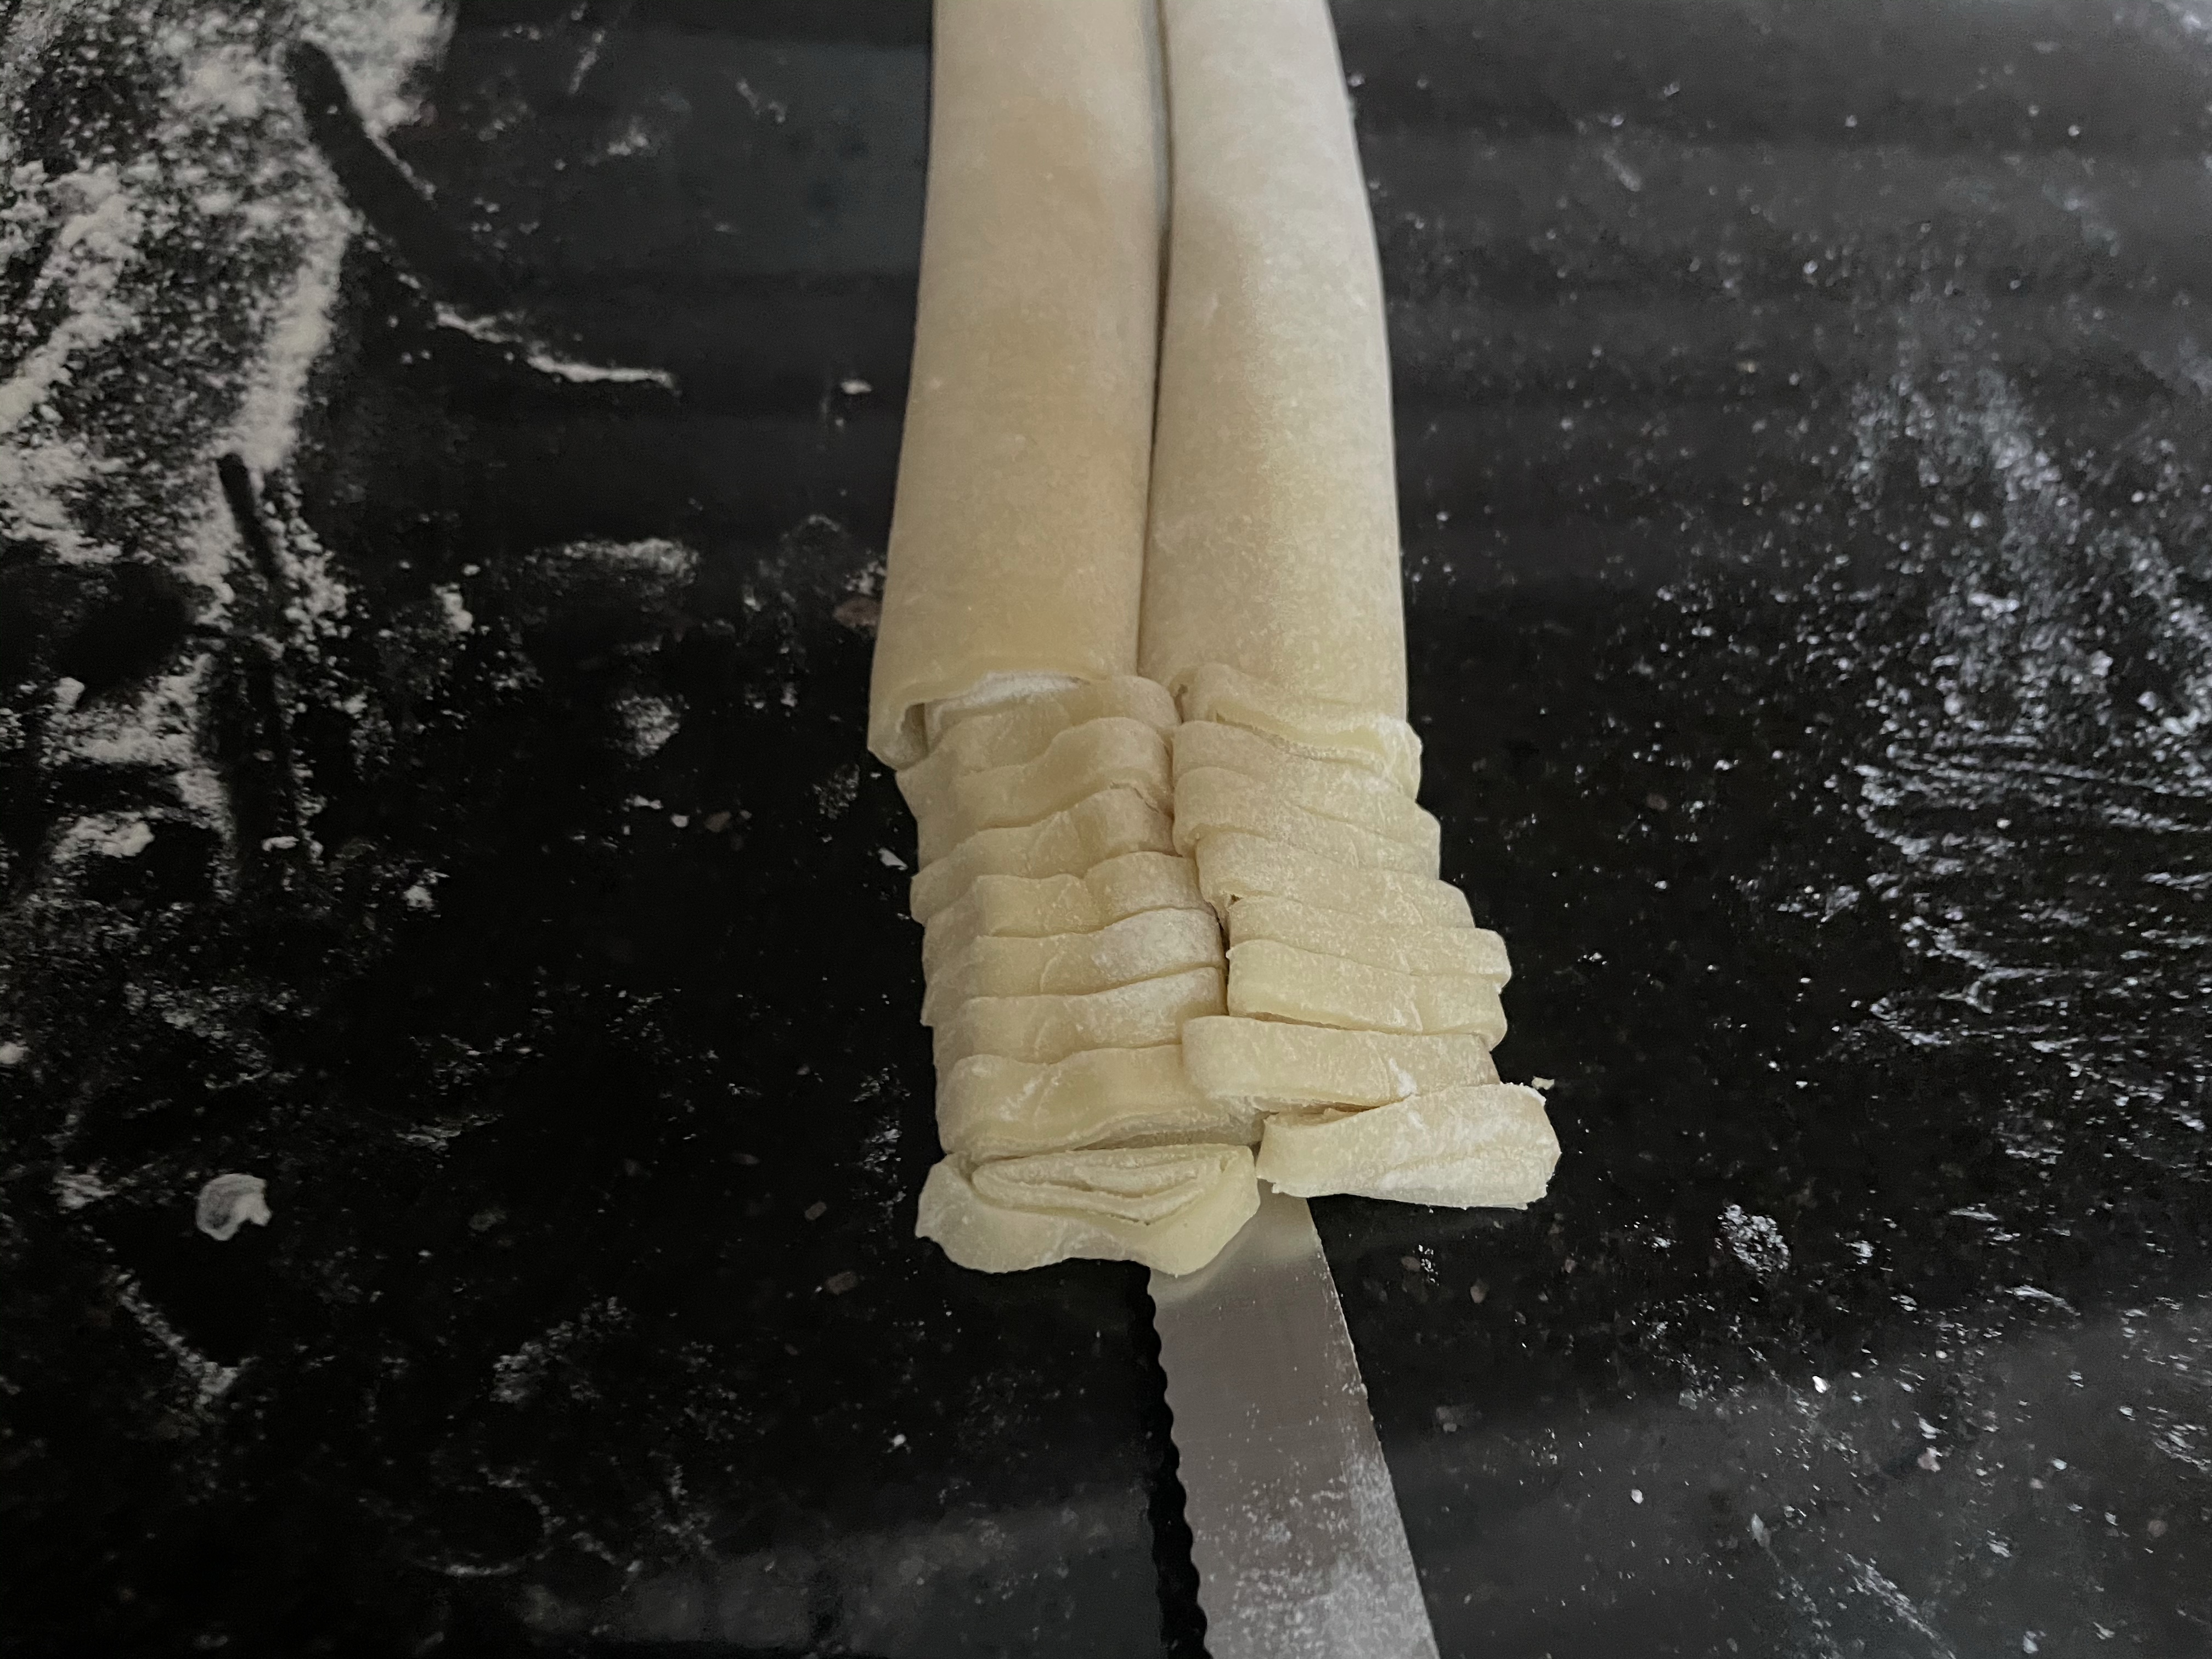
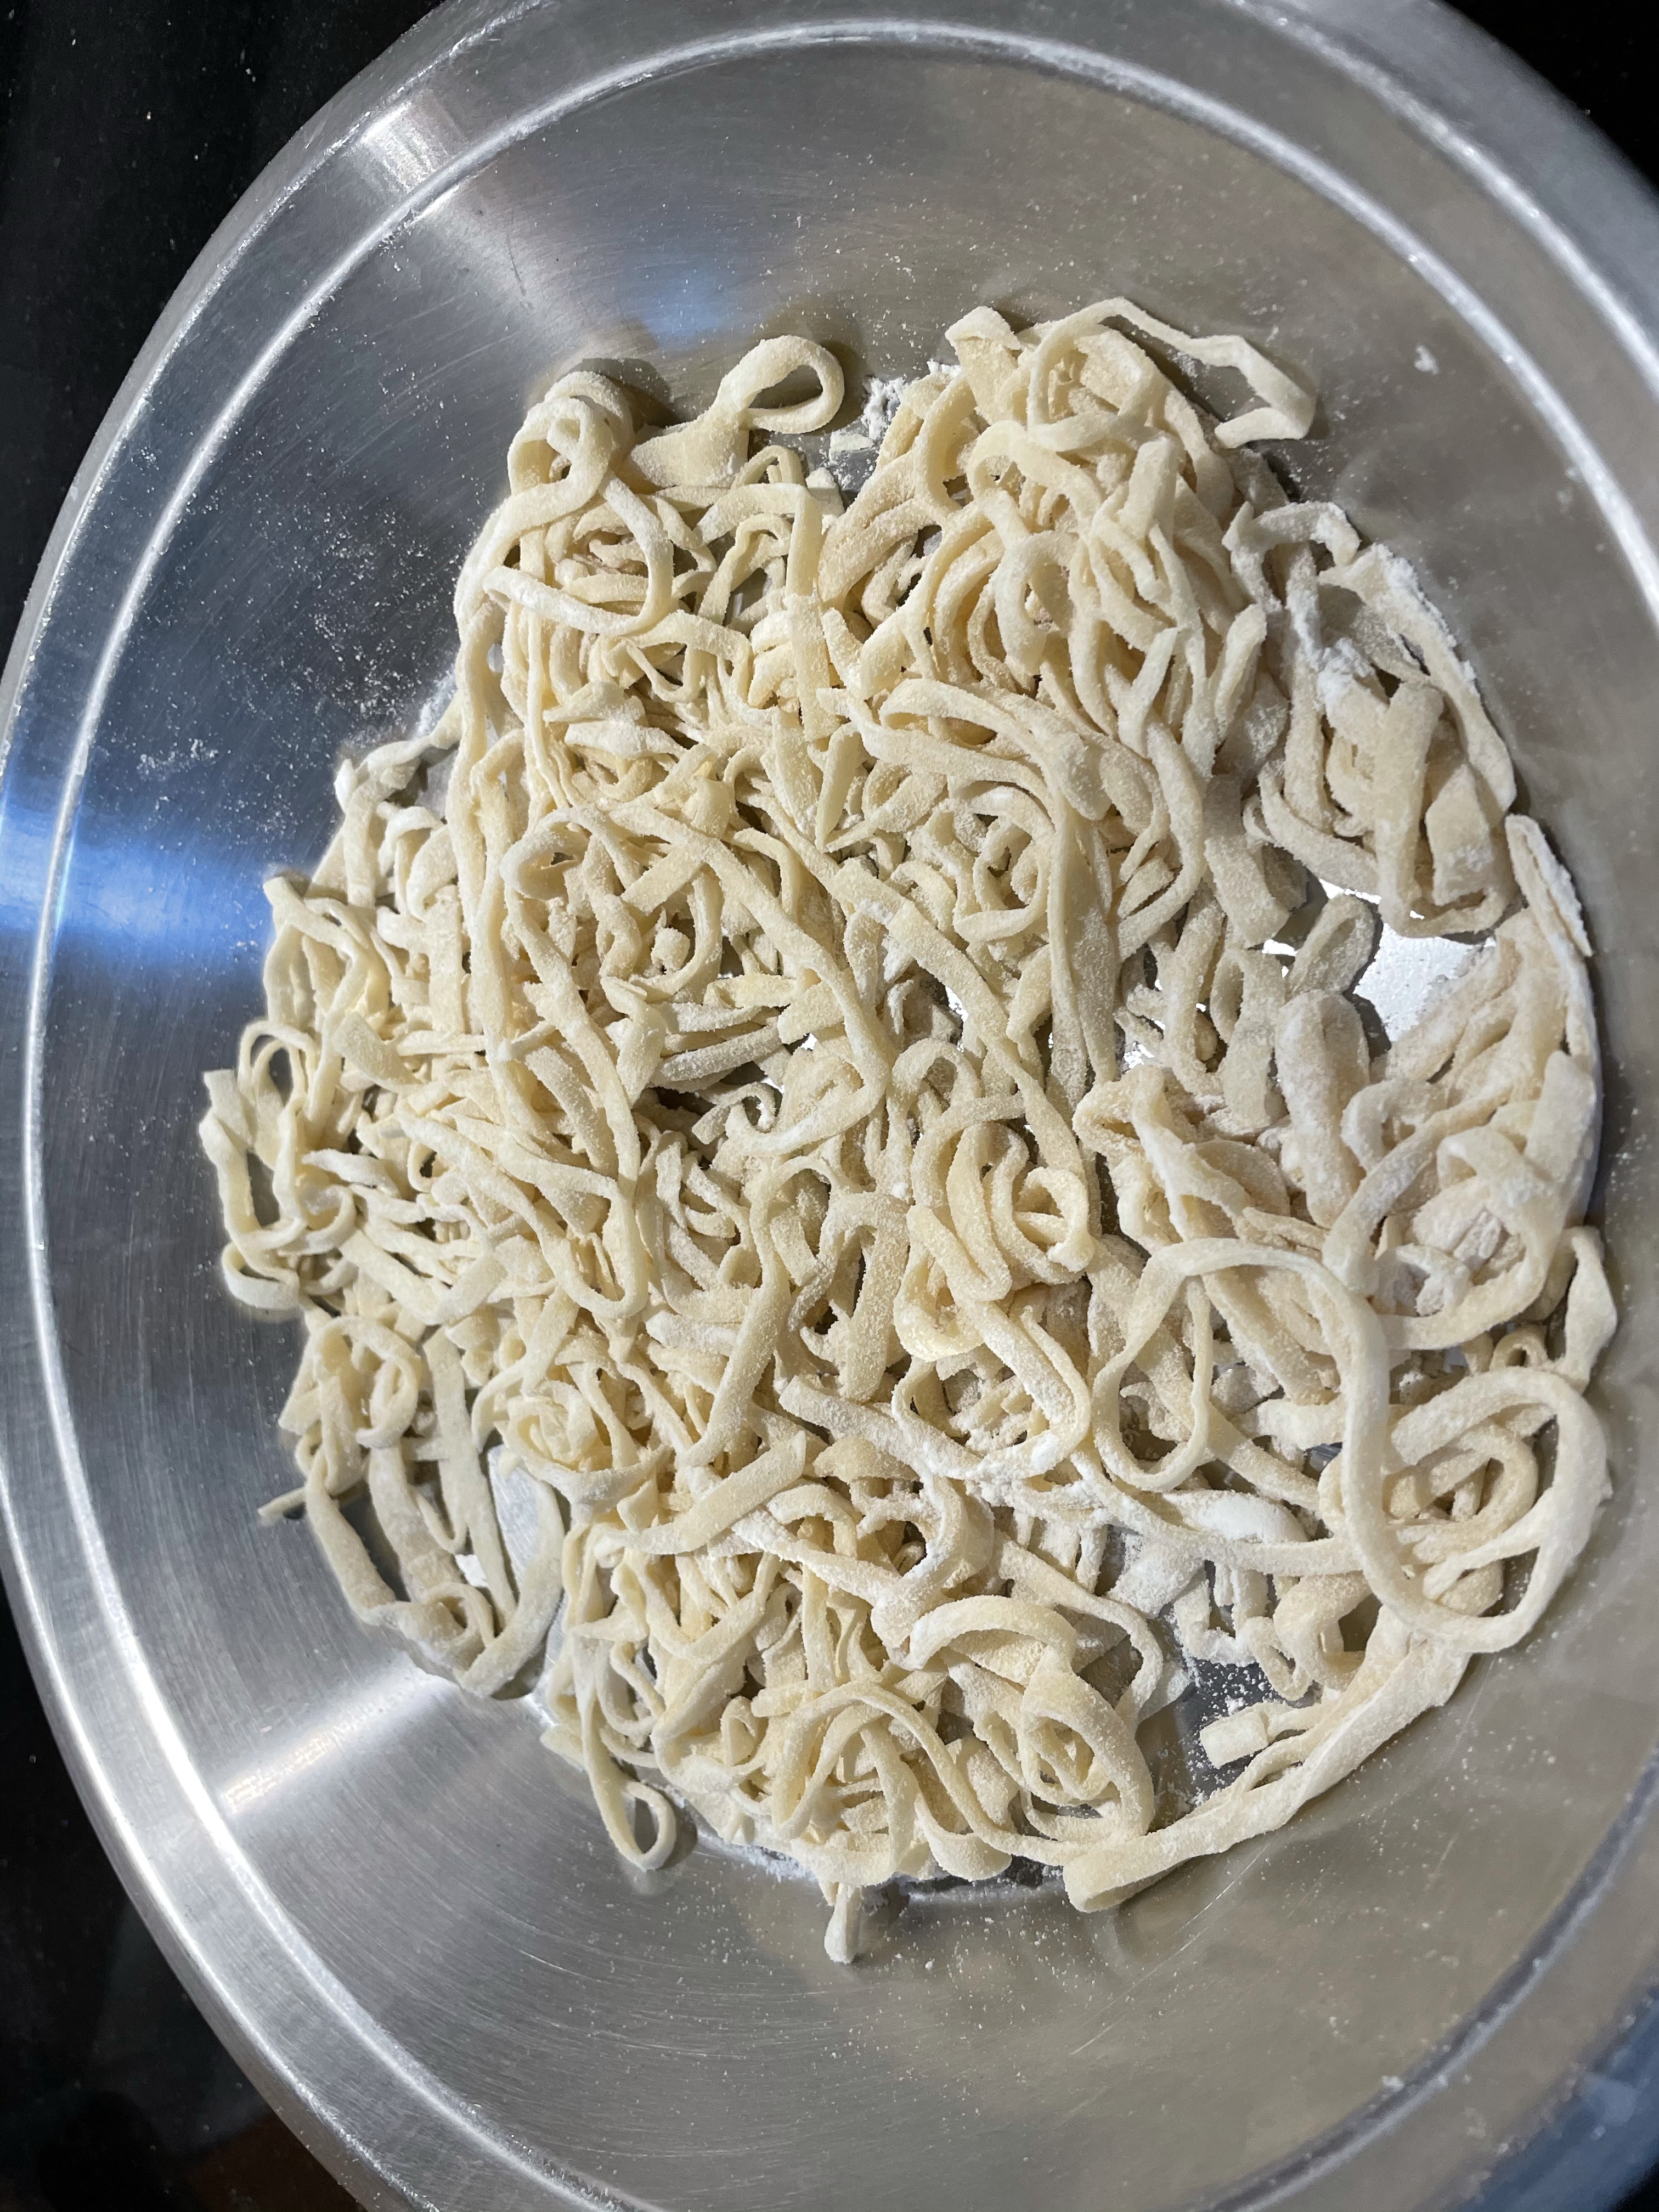
Making of the pasta is cakewalk for someone like me who have spent years kneading and rolling chapatis. Cutting and shaping the pasta is the best part of the whole exercise and one can’t suppress the glee of seeing the fresh pasta strips neatly hanging down both sides of your kitchen knife. The pasta is made and left to air in the ‘thali’ and you move on to the roasting of breadcrumbs, frying of the veggies and making the super silky and aromatic white sauce.

It is indeed a beautiful sight when the pasta strips come up in rolling boiling water. In a minute the cooked pasta, the sauce, the veggies and some roasted bits of crunchy bread come together. Scoop the pasta into the waiting warm plates, sprinkle some more of that crunchy bread bits and move to the dining table set with a dimly glowing lamp, some homemade wine. No worries if all the restaurants are closed… here is fine dining for you, right at home!

Ingredients for pasta

Plain flour/maida : 125gms.

Egg: 1

Salt: 1/4 tsp.

Olive oil: 1 tblesp.

Water :2tblesp approx.

On the neat kitchen counter measure and lay the flour.

Make a well in the centre and add the other ingredients except water. With a fork slowly draw in the flour to the liquid. Once mixed in remove the fork and with your hands bring the mixture together into a tight dough. You would need to add approximately 1and 1/2 – 2 tblesp of water to get everything together.

Now knead the dough well with the palm of your hand, extending and folding in till the dough becomes very pliable. Cover in cling film and leave to rest for 1/2 an hour.

Clean the kitchen counter and dust with some flour. Roll out the dough to a big chapathi of approx 1 mm thickness. Care is to be taken to see that the rolled dough is of even thickness all over. Dust well with flour.

Now from the left and the right roll the dough into the centre. After rolling start to cut thin strips from the bottom as shown in picture above. Once you finish cutting 6-8 strips, bring the knife under the centre and lift up to see pasta strips falling down on both sides of the knife. Transfer to a large plate and dust with some flour.

Do the same procedure till all your pasta is made. Lay your pasta to dry in the large open plate.

For the roasted breadcrumbs

Roughly cut the bred into little cubes, coat with olive oil and some rosemary and roast in oven for 10-12mts.

Ingredients for sauce

Milk : 1 cup.

Water: 1/2 cup

Plain flour: 3 tblesp.

Olive oil: 3 tblesp.

Butter : 1 tblesp.

Dried oregano: 1 tsp.

A small soup cube.

Garlic pdr: 1/2 tsp.

Chilli flakes: 1tsp.

Salt to taste.

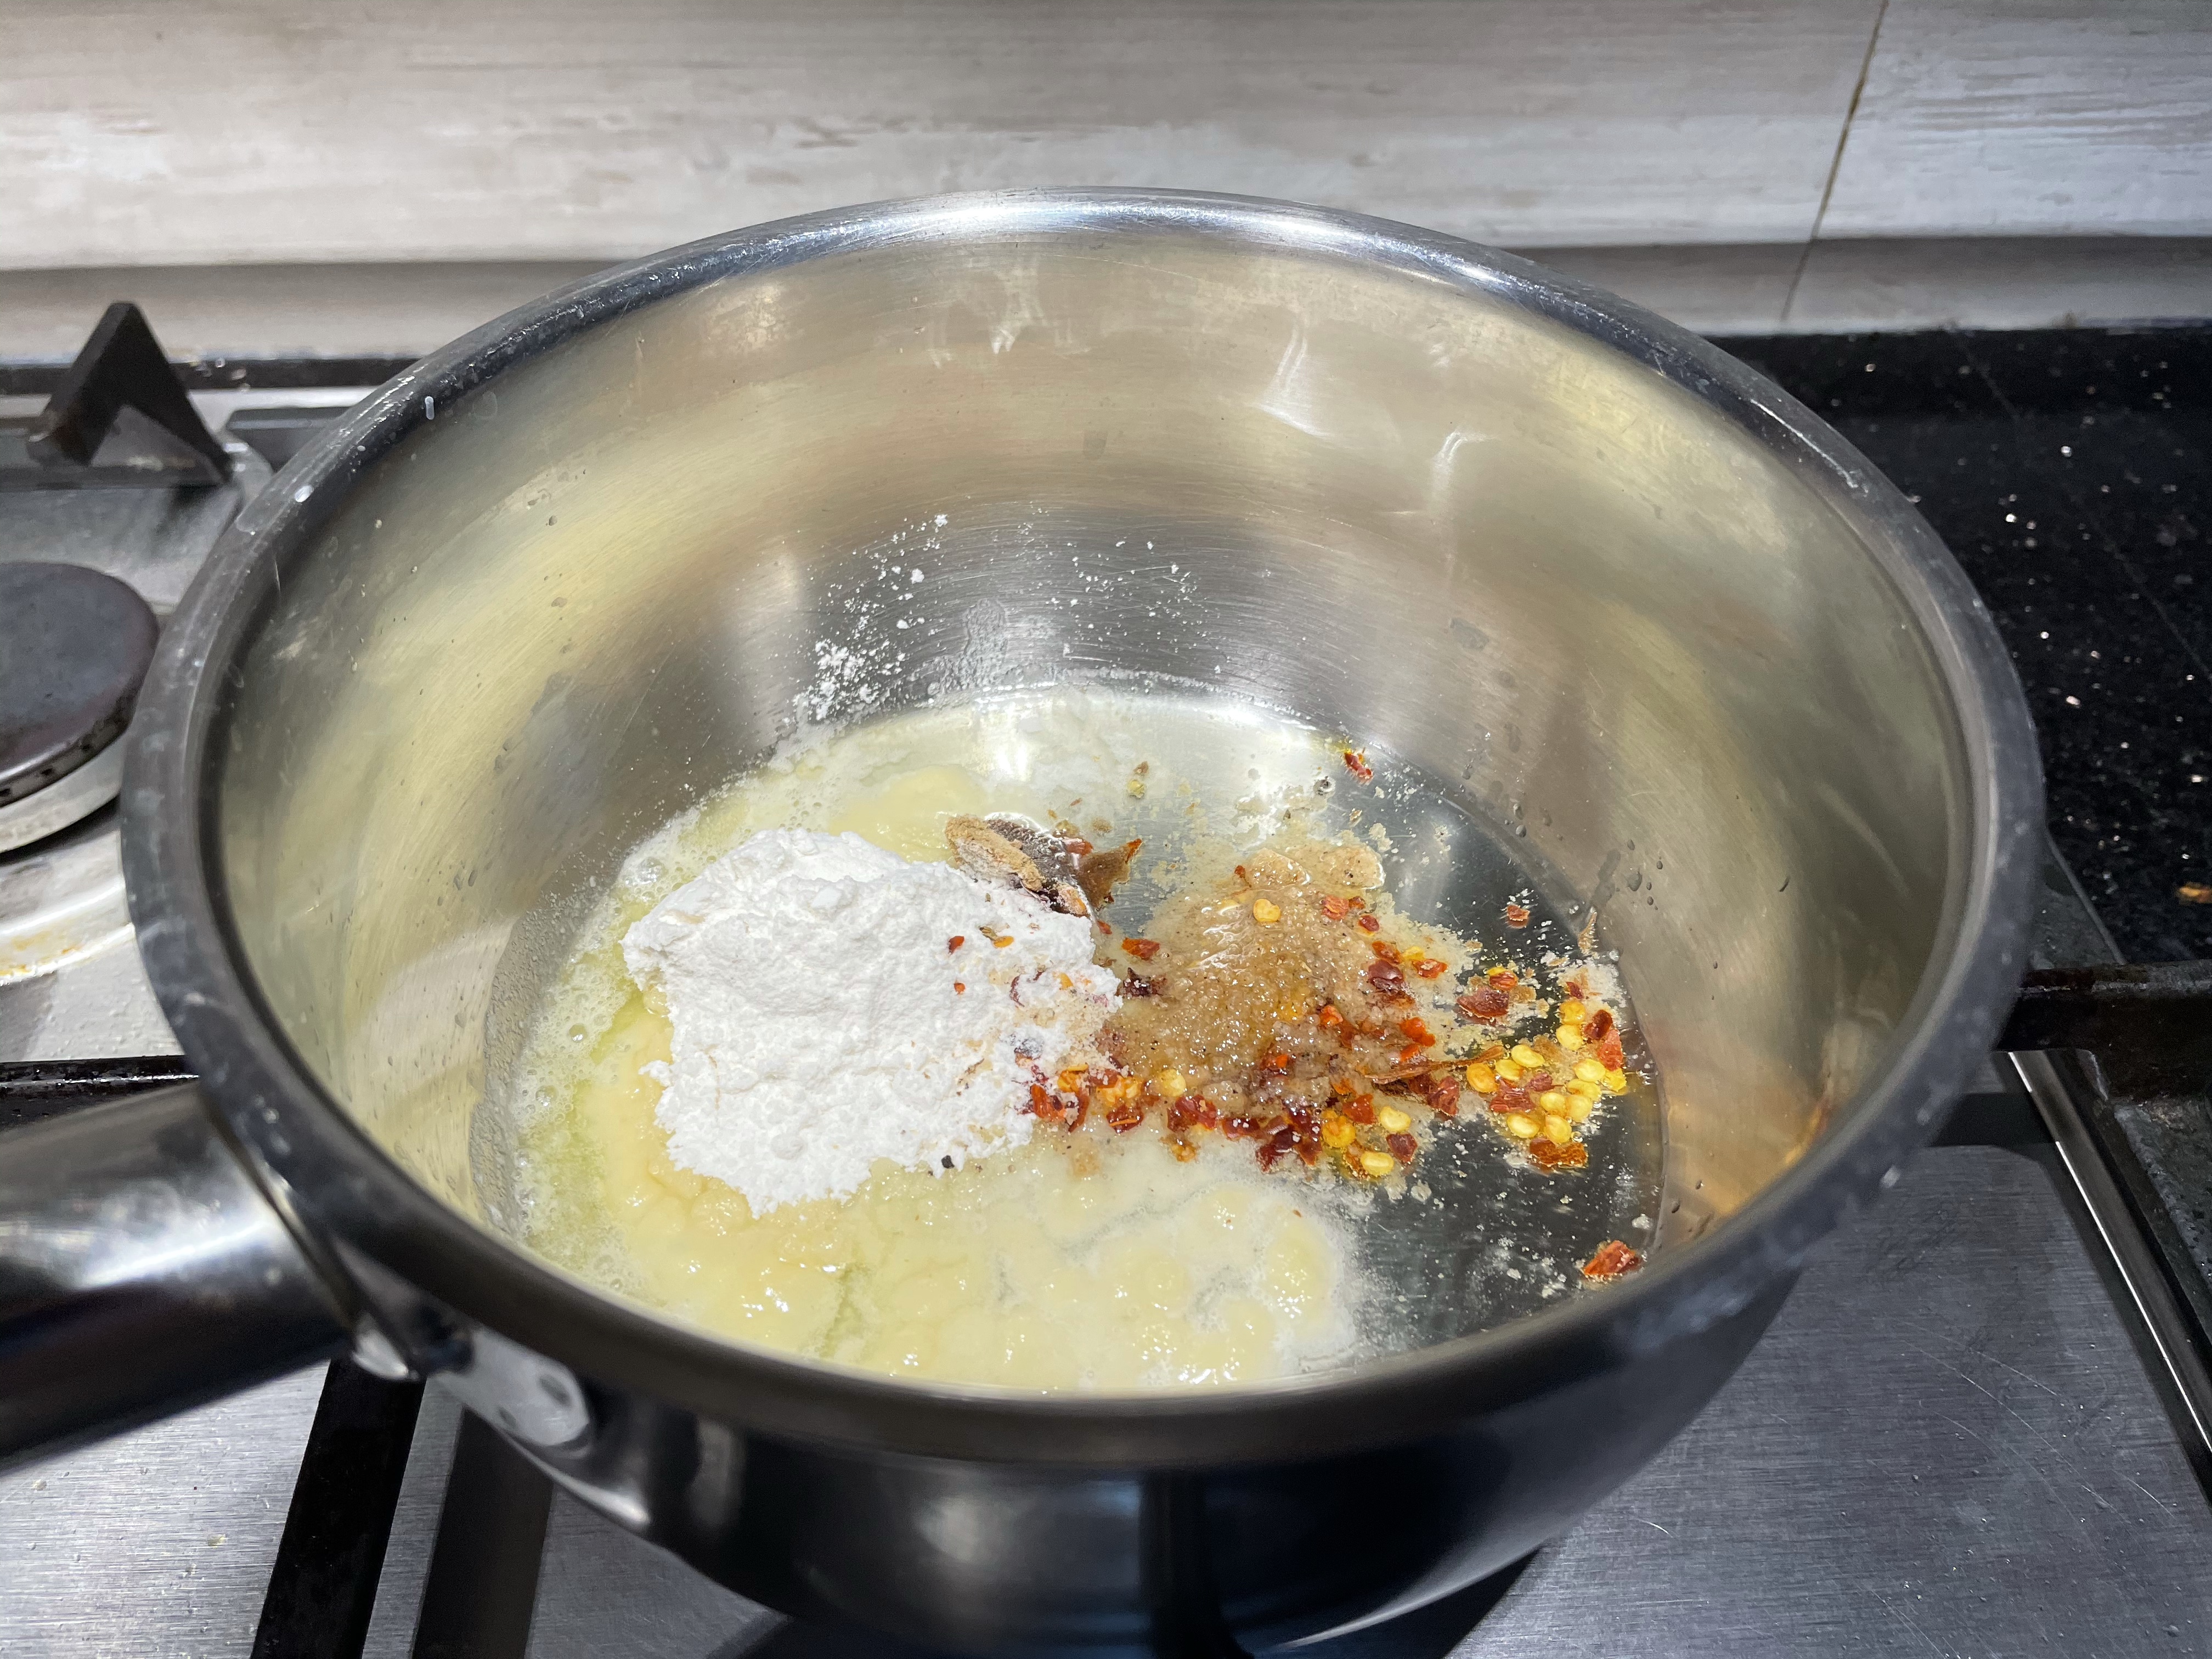
Keep a bottom heavy saucepan on mild heat and add olive oil and butter. Add the flour, garlic powder and chilli flakes and fry till the mixture gets slightly roasted and aromatic. Slowly add the milk and the 1/2 cup water and cook till the sauce turns thick and silky. Add the oregano and salt to taste. Keep covered.

For the roasted vegetables

Zucchini: a small piece, cut lengthwise and then cut into thin half moons.

Garlic flakes: 5-6 chopped.

Onion: 1 small, chopped.

Red capsicum: half of a small one, chopped.

Olive oil: 2 tsp.

Keep a heavy based fry pan on high heat and add oil. Add onion and garlic and sauté till transparent. Add the vegetables and fry till they are done and some pieces are roasted.

Assembling the pasta

Cook the pasta in a casserole of salted water at rolling boil for 2-3 minutes and drain reserving some of the pasta water.

Combine the cooked pasta, roasted veggies, white sauce and some bread crumbs. If the pasta looks dry add some saved pasta cooking water. Transfer to plate, sprinkle some more bread crumbs and enjoy!

Sambar: the queen of a South Indian Breakfast

To wake up to the aroma of bubbling Sambar on a Sunday morning…. that is one of the little pleasures of life. Normally a relaxed Sunday is meant for a visit to the nearby SouthIndian restaurant… the clatter of little sambar and chutney tumblers, the sizzle of dosa on the tawa, the loud splash of hot coffee poured into traditional coffee glasses… all that send waves of expectation and an assurance of gastronomic satiation.

The multiple lockdowns have robbed us of those simple pleasures of life… restaurants are closed and there is no hope of them opening in the near future. But Yo! All is not lost. You have one or two tricks up your sleeve too. The idly batter is in the fridge. And so is the grated coconut. It is time to roll up sleeves and plunge headlong into the making of Sambar.

Sambar is all about good Sambar podi/ powder. Ideally freshly ground spice mix is the best bet for a good Sambar, but in these changing times it’s better to adapt to the quickie version. Sambar podi making is no rocket science … a handful of ingredients, a heavy tawa and a little bit of patience is all that you need to produce that magic aromatic spice powder in your own humble kitchen. And what more… once made it keeps in your shelf for a good 6 months. Once Sambar podi is done, the rest is just cakewalk. With the bubbling sambar on the stove, idlies get steamed, silky Upma cooks in another stove and your mixie/blender bobs up like mad to deliver coconut chutney. And what a proud moment it is to come out to the dining table triumphant and beaming with your very own homemade southIndian platter for Sunday breakfast!

The magic of Sambar works on everyone..young or old. Every time I make Sambar podi, the house smells heavenly and it brings old memories of our family trip to Srinagar in the early eighties. It used to be a Herculean task for us to search and find a southIndian cafe as we travelled through the length and breadth of Kashmir. But once we strike gold somehow and finally arrange ourselves clumsily and noisily around the table, placing order would be instant… the youngest of the group, the little cherubic cousin sister would lead with her high pitched shriek….I take Dosa- Sambar and the rest would follow on cue.

Ingredients

For Sambar podi

Coriander whole: 250 gms.

Methi/fenugreek: 1/3 cup.

Red chilli whole-25-30 no:s. I used a mix of Kashmiri and spicy red chillies./

Gram dal/ split chickpeas : 1/3 cup.

Keep Kadhai on moderate heat and start dry roasting coriander. Keep roasting till you see the coriander turning darker and golden in colour and also start crackling and popping. Once the coriander turns golden and aromatic add the chillies and continue roasting till you see the chillies turning deep red and plump. Remove to cool in a wide plate.

Now add the fenugreek to the kadhai and roast till they turn reddish. Care is to be taken not to burn. Remove from fire and transfer to the plate to cool.

Now add the chana dal and roast till they turn reddish golden. Remove to the plate to cool.

Once cool grind everything to a fine powder. Your Sambar podi is done.

For Sambar

Drumsticks: 2 no:s, cut into 3” pieces.

Madras onions/ shallot: 8-10

Tuvar dal /gram dal : 1/3 cup. Wash and cook the dal with a cup of water in a pressure cooker till we’ll cooked/ 2 whistles.

Tomatoes: 1 big or 2 medium chopped big and crushed with hands a bit to be pulpy.

Ladies finger: 6-7 cut into 2” pcs.

Tamarind: 1 lime sized ball soaked in 1/2 cup water.

Asafoetida : 1/4 tsp.

Turmeric pdr: 1/2 tsp.

Kashmiri chill pdr: 1/2tsp. I have added it but if you want to keep the curry mild, you can avoid it.

Sambar podi: 2 tablespoons.

Ghee :1 tblesp.

Mustard: 1 tblesp and 2 whole red chillies broken for tempering

Curry leaves and coriander leaves : a few

Salt to taste and some coconut/veg oil to cook

Keep the veggies ready. Cook the drumsticks in some water till done. The dal should be properly cooked in the cooker. In a kadhai add some oil and fry shallot/ madras onions and ladies fingers for 3-4 mts.

Add the crushed tomatoes and sauté for a minute. Now add the Sambar podi, asafoetida, turmeric pdr, Kashmiri chilli pdr(optional), salt and fry for another 2 mts. Add the drumsticks along with the water and let it come to a boil.

Transfer the mixture, the cooked dal to a deep casserole and add another cup of water and bring to a boil. Add the squeezed tamarind water, curry leaves and green coriander and let the curry simmer for 3-4 mts. Take off the flame.

In a small kadhai add ghee and temper mustard and chilli. Add to the curry. Finger licking good Sambar is ready. Serve with idlies , dosas or Upma.

Moroccan spiced Pasta Pizza

Pizza hut and Dominos are there almost in every country. Here in India the pizzas they dole out are more adapted to Indian palates. Butter chicken, Paneer tikka, Achari do Pyaza ….they come in all delectable flavours. It is a totally different story however in Europe. There the pizzas are the genuine ones and they come delightfully cheesy but without that spice kick that an Indian in foreign lands crave.

My daughter who usually loads up on the Indian spicy pizzas while on her holiday to India, often yearns for them once back home. So it is always with a guilty mind that we order them when she is away on lazy Sundays or days that I decide to shun the kitchen altogether. Making a spicy pizza from scratch at home has always been on my mind. If I can successfully concoct a recipe which more or less comes close to the Domino’s one she relishes, I can pass it on to her and also to all her friends who love Indian flavours. The task is momentous….if the recipe is cumbersome and long she might never attempt it in the first place. Also the ingredients too must be easily available.

Finally I zeroed in on the Moroccan spiced pasta pizza …one of the new flavours introduced by Dominos. Moroccan spice powder can be made and stored in advance or if you are really lazy to make your spice mix a random visit to any exotic shop in the locality can get you the said spice mix. Pizza base can be made from scratch…there are many good recipes one can follow and dough making can be a stress busting exercise. And if you are not up to that, help is at hand at the nearby grocers where you can buy a readymade one. Once these hurdles are crossed, the rest is easy…some mixing and shaking….you have your super creamy Moroccan mix ready, some roughly cut veggie toppings, a handful of cooked pasta and lots of mozzarella. Your baby is now ready to go into the oven only to come out as that super smelling crisp based, golden cheese topped pizza. Every bite would bring memories of home, I’m sure.

Ingredients

Pizza base ready made/ Home made pizza dough : 16″ base. I made the dough from scratch. I followed the recipe posted by sugarspunrun.com and the results are fantastic.

For the moroccan spice mix : 2 tblesp Jeera/Cumin roated and, 2 tblesp coriander whole roasted and, 2″pcs dry ginger, 1 tsp chilli pdr, 1/2 tsp pepper pdr, 1/2 tsp smoked paprika, 2″stick cinnamon,,1/2 tsp turmeric pdr, 3-4 cloves, 1/2 tsp allspice,1/8th tsp nutmeg pdr.

For the pizza sauce : 2 tomatoes pureed, 3-4 garlic cloves, 1/2 tsp chilli flakes, 1 tblesp tomato paste, 1 tsp sugar, 1 small soup cube, 1/2 tsp chilli pdr,1/2 tsp dried oregano 2 tsp olive oil and salt to taste

Onion : 1 cut into cubes and separate the layers.

Capsisum : cubed pieces coloured capsicum almost a handful.

Pasta : 1/4 cup of cooked pasta

Mozzarella : 1-1and 1/2 cup shredded.

Method

Combine all the ingredients for the moroccan spice mix and dry grind to a fine powder.

To make pizza sauce take a kadhai and add 2 tsp olive oil. On low heat add 3-4 garlic cloves chopped. In another minute add 1/2 tsp chilli flakes. Add the ground tomatoes, tomato paste, the soup cube, 1tsp sugar, dried oregano, 1/2 tsp chilli pdr and a sprinkling of water and cook till you get a thick and bright red pizza sauce.

Prepare the moroccan spice spread by combining 1 tsp of moroccan spice mix with 2 tblesp of mayonnaise, 2 tblesp of thick cream, 1/2 tsp of paprika and salt to taste.

Roll out the pizza base and spread on the baking pizza pan. Spread the tomato pizza sauce evenly. Now spread the moroccan spice creamy sauce evenly over the base.

Decorate the top with onion, capsicum cubes and cooked pasta. Sprinkle liberally with shredded mozzarella. Bake in a 200 deg oven for 20 minutes.

Tasty spicy moroccan mix pizza is ready.

Crispy Crumbly Mathris

Mathri is essentially a Holi special snack. None can escape the wildly thrown colours and the water jets of coloured water from pichkaris of Holi if you are in any north Indian town or city. By mid-morning a languor and weakness in limbs sets in and almost all who play drag themselves home for something to quell extreme hunger pangs. Dunking in deep into the goodie tins to take out mathris and directing them one by one to the opening which is your mouth in an otherwise unrecognizable multihued visage, there’s no other option but to laugh till you buckle down seeing the frenzied gobbling of similar looking monstrous creatures around you. In the group there would be the otherwise no nonsense uncle or your serious looking bookworm friend who have all transformed themselves into wildly colourful apparitions.  

For a pucca South Indian like me, Mathris were alien. For that matter, things made of plain flour were a rarity during my younger growing up years. South Indian snacks were all about rice. We did have at home a profusion of appams, adas,vadas…all made of rice or lentils. The only things we knew made out of flour were cakes and biscuits in the bakeries. So when I was offered Mathris at a friend’s place in Delhi, they looked as unappetizing to me as flat brown pebbles on a plate. But then soon I learned to enjoy them with Aam ka achar or spicy chutney, though I still was not taken in by their plain round jagged rocky look.

Today Mathris have evolved into dainty delicious teatime snacks. Just a random visit to any NorthIndian Tea house, you’ll find them sometimes in delectable triangles with wafer thin layers or little layered roundels with a sprinkling of jeera and nigella seeds. They adorn beautifully arranged high-tea tables at homes too flaunting their many layers luring anyone to bite into their crumbly goodness. For all their complicated and many layered look, these mathris are really easy to make. With minimal ingredients and a little bit of patience while frying, anyone can be a master mathri maker. A steaming cuppa and a little plate of dainty and crisp  mathris, a thriller playing on Netflix….Oh, you can tide over the 2nd, 3rd or the Nth lockdown!

Ingredients

Plain flour : 2 cups.

Jeera/Cumin : 1/2 tsp.

Ajwain/ Carom seeds : 1/2 tsp.

Vegetable oil : approx 4 tblesp.

3 tblesp oil mixed with 3 tblesp plain flour to make a paste.

Salt to taste.

Water to make the dough.

Oil for frying.

Method

Take 2 cups of flour in a large flat vessel and add the jeera, ajwain and salt.

Slowly add the 4 tblesp of veg oil , little by little , working into the flour to make a crumbly bread crumb like texture. You must be able to make the flour into a ball in your palm. I needed only 3and 1/2 tblesp oil to get the flour to hold shape.

Add water little by little and form into a tight dough. Rest the dough covered with a cloth for 1/2 an hr.

Make 8 equal sized balls of the dough.

Roll one ball into a thin roti, making it as thin as possible. Spread the oil flour paste lightly on the surface.

Roll the next roti and place it upon the first pulling at the edges to cover the 1st one. Now apply the oil -flour paste on the 2nd roti. Repeat the process till you have 4 rotis one on top of another.

Now tightly roll the rotis into a log shape.

Cut the log in an inch thick rounds. Now each round, gently flatten with the rolling pin . You can see the different layers as you flatten.

In a thick bottomed kadhai, heat oil. the oil should at medium heat. Add the flattened discs 4-5 at a time so that you don’t crowd the kadhai and fry at low heat till crisp and golden.

Enjoy mathris with any pickle or spicy chutney.

Fluffy Ragi Idlies

It has become a fad to go for exotic foods these days…..a casual visit to the neighborhood supermarket would prove it. Neatly lined on the shelves would be brown basmati,quinoa,couscous in the grain section and vegetables like leeks, zucchini-green and yellow, brusselsprouts…the list goes on. But once in a while it is good to go to basics. Millets like Ragi, barley are grown widely in our land and a routine browsing in the net would tell us about the health benefits of millets. Ragi is called the wonder grain for its nutritive properties and can be the simple solution for tackling obesity and growing diabetic problems among most of us. And best of all it is easy on the pocket too.

All understood and registered that millets are the powerhouse of nutrition, but when it comes to taste the impression is a big ‘yuck’. We are conditioned to love our butter dripping parottas and polished white rice and would rather not try anything to do with millets. I too belonged to this category till I had to go for a long overdue medical checkup in a big hospital. Early morning itself I joined the queue of people going from one counter to another for our blood tests, ultrasound scans and the like. By the time I came to the end of the line of tests my stomach was registering its protest of not receiving anything solid rather loudly. So when the lady at the desk handed me a breakfast coupon and directed me to the dining area I reciprocated with a grateful and cheerful smile. Quick to take a plate I decided to do a recce of what all was on offer for breakfast….steaming ragi idlies with chutneys and sambar, foxtail millet khichdi, little rounds of ragi rotis with dal. Understanding my quizzical look, the chef replenishing the quickly vanishing food quipped…” we are celebrating millet week”.

It was with much apprehension that I loaded my plate with 2 ragi idlies….though they looked unappetizingly reddish brown, the way they bobbed as they landed on my plate told me all would be well. A bite into one, and there was no stopping me. Those idlies were wonderfully light and fluffy and really tasty too and as I headed to the counter in the matter of seconds for my second helping, I thought I caught a gleeful nod from the chef.

Ragi idlies are easy to make. The process is much similar to the regular ones. Once the batter is made it too needs to ferment overnight. Use the batter to make idlies the first 2 days and then the remaining batter is good for making dosas which turn out crisp and tasty. And for those who wrinkle up their faces at the sight of these brown idlies, just whisper in their ears that these idlies are all power and no fat…that’ll do the trick!

Ingredients

Ragi, whole : 2 cups full.

Idly rice : 1 cup full.

Barley rice : 1/2 cup.

Udad skinned : 3/4 cup.

Methi/fenugreek : 1 tblesp.

Water to soak.

Salt to taste.

Method

Clean and rinse the Ragi, rice and barley and soak them together in a container with plenty of water for 5-6 hrs.

Soak the Udad after cleaning along with methi separately in another container with plenty of water.

In the grinder, grind the soaked udad mixture with some water added from time to time to make a silky smooth paste. The batter would double in size as it becomes airy while grinding. If using a mixi, add cold water to make the batter remain at room temperature. Remove and keep in a vessel.

Now grind the soaked ragi, barley and rice along with some water to a somewhat coarse paste,

Once done add the ground udad mixture into the grinder and allow everything together to run for 2 minutes. Also at this point add the salt. If using mixi, just take out the coarsely ground rice, ragi, barley mixture and add it to the udad mixture along with salt and whisk with a ladle really well for a few minutes.

Your ragi idly batter is ready. Keep to ferment overnight.

Pour a ladleful of batter into greased idly moulds and steam in an idly cooker for about 10mts.

Soft spongy idlies are ready. Enjoy them with different chutneys and Sambar.

Champakkulam style Mathi Pattichathu

Being in Kerala is a boon. There are so many places you can be one with nature….the deep and dark forests of wayanad, the coconut tree edged pristine sand beaches or the tranquil green tiny islets in the beautiful backwaters….all are just a few hours drive from home. Last month it was to Champakkulam that we headed to, a beautiful homestay which was accessed only by boat till recently. Covid scare had literally driven away tourists from Alappuzha…as we drove we could see houseboats, big and small, lying idle and anchored in a line. This was quite unusual because otherwise December January months are peak tourist seasons here.

Our host warmly welcomed us saying we were some of the first guests to arrive after the long and gruelling Covid lock down. People who eke a living out of tourism had really suffered .The little boatmen who would take guests around were without any source of income, he explained. The cooks in the otherwise bustling kitchen at the property were kept on a shoestring salary… all in all it was a difficult time and if not for their tiny plots of farm lands and some fishing, it would have been a nightmare for them to survive.

The two days we spent there, we were showered with hospitality and care. Being the only guests in the property, we spent time combing through the adjacent paddy fields, did some serious bird watching and through our thoughtfully packed binoculars we saw the bright blue kingfisher catching his fish, the little flameback with its crowned head perched high up on coconut tree trunk. Early mornings and evenings we spent in little boats which wound their way through little waterways, taking in the amazing scenery, the serenity and the depth of the still waters with the crimson sun emerging and setting in the horizon.

No holiday is complete without food and what a feast it was! We were pampered with a variety of local delicacies…fluffy white idiyappams vied with bouncy porous vattayappams, downed with a host of authentic fish, duck and mutton curries. But the stand out was the mathi pattichathu. Just the first spoonful of the tongue tickling wonder was enough to understand that this Pattichathu was like no other I had tried at home. I decided that I needed to get this recipe. Finishing my lunch I found my way to the remote kitchen at the back of the property and coyly put forward my request to the bemusement of the ladies there. “ Ushe…ee madathinu aa cheruva onnu parnju koduthe” (Usha… tell this madam how you made the dish). I thanked my lucky stars that we were the only guests, otherwise where would she get the time to share her recipes.

I waited all this time to get the best naadan mathi to make this dish. The coconut was freshly scraped, the onions peeled and ginger skinned and all the while my excitement grew. The cook had crushed the mix together in her ammikkallu (mortar, pestle), but I don’t have that “luxury “and so had to settle for a quick churn in the blender. The mixing part was the best when the fish, the coconut mix, the coconut oil and curry leaves all come together and then get soaked in a liberal sprinkling of tamarind water. Cooking the fish is just a matter of a few minutes. The all-pervading aroma of the dish fills the kitchen. Mathi Pattichathu – rice combo is one made in heaven and one can polish off a good portion of it in no time. This is one meal that can tip your scales the wrong way, mind you, but then for those who live to eat when has the weighing scale been ever a threat!

Ingredients

Mathi/Sardines : 1/2 kg, cleaned and cut 2 inches long.

For marination : 1/2 tsp chilli pdr, 1/2 tsp turmeric pdr, 1/2 tsp salt.

Coconut scraped : 3/4 th cup.

Shallots : 8-10/1/4 cup chopped.

Kudam puli/ Malabar dried tamarind : 4-5 pcs soaked in water for 15mts and crush and strain to extract liquid.

Ginger : 2 inch pc, chopped.

Garlic : 5-6, chopped.

Green chilli : 2, chopped.

Kashmiri chilli pdr : 2 tsp.

Turmeric pdr : 1/2 tsp.

Pepper crushed or powdered : 1/tsp full.

Salt and coconut oil to taste.

A few sprigs of curry leaves.

Method

  • Prepare the ingredients for masala and run for just a turn in the blender. The mixture should be grainy in texture.
  • Marinate the fish with 1/2 a tsp each of red chilli pdr, turmeric pdr,salt and keep aside for ten mts.
  • A glazed mud pot is ideal to cook the fish. In the pot combine the fish, the ground masala, salt, coconut oil and curry leaves and pat down to a mound in the base of the pot.
  • To this add the tamarind water which should be approximately 1/2 cup. Cover with lid and keep on medium flame. In between give the mixture a shake. It is not advisable to use a ladle as the fish is delicate and can crush.
  • The fish would be ready in 10-15 minutes. Top up with a spoonful of coconut oil and serve with hot steaming rice.

Curry in a Hurry

We all have those lazy lazy days when the only desirable thing to do is to just sprawl out on your bed with some interesting reads or listen to music while reaching out to that ever dwindling stack of chips in the bowl. But in the back of your mind there would be a nagging feeling that sooner or later you’ll have to move to the kitchen and pull of a decent meal at least to keep up your reputation as a promising cook.

My aunt during one of our chats over phone revealed to me the secret of how to pull out a rabbit from the hat….errrr….dish up an enticing curry, sure to be lapped up with gusto by the entire family in the matter of minutes. My aunt, all of 75 is a doyen in the kitchen and has satiated palates and tummies of generations of Parethodies(our family name). All of us, right up to the youngest in the family have a favourite dish of hers. It would be the red paneer curry ,my daughter’s favourite or the silken smooth gothambu appam which only she can perfect. With this curry my aunt has scored a sixer indeed as the curry turns out dashingly bright and inviting every time. It turns out a savior just when you are about to give up hope of putting something decent on the table and avoid that “all hopes lost” looks from family.

Curry in a hurry needs some fresh, green ladies fingers and a bright red tomato. All the magic happens in such a short time in the Kadhai on fire wherein the veggies are cooking as they are frying. In go the spices, the tamarind water and the coconut milk and as you look the mixture evolves into this creamy red concoction with dashes of green as you gently run your ladle. A shower of mustard-chilli tempering and the curry is good to go to the table. You don’t need many accompaniments to down rice or rotis when you have this curry…. Maybe some chips or a curd raita would be fine.

Ingredients

Serves 4

Ladies finger : 5-6 no:s , cut into 2 inch pieces.

Tomato : 1 medium, cubed.

Red Kashmiri chilli pdr : 2 tsp full.

Methi pdr/ fenugreek pdr : 1/4 tsp.

Turmeric pdr : 1/2 tsp.

Tamarind : 1 small lime sized ball soaked in 1/2 cup water.

Coconut milk pdr : 3 tblesp, mixed well without lumps in 1/2 cup warm water.

Salt to taste.

Oil : 2 tsps + 2 tsps for tempering.

1 tsp mustard seeds, 1/2 tsp methi seeds, 1 whole red chilli and some curry leaves for tempering.

Method

  • Assemble all ingredients for the cook.
  • In a Kadhai on heat pour 2 tsp oil. Srt frying the cut ladies fingers. After 2-3 minutes add the cut tomato and fry for 3-4 mins.
  • Keep the flame low and add the chilli, turmeric, methi powders and fry till they give a nice aroma. Take care not to burn the spices.
  • Add the tamarind water and add salt and allow the mixture to boil.
  • Add the coconut milk ( coconut milk powder mixed in warm water) and give a stir.
  • Allow the curry to mildly come to a boil. Run a ladle through and once the curry has achieved the right consistency take off gas.
  • In another kadhai add 2 tsps oil and temper the mustard, methi and red chilli and curry leaves. Once it splutters add it to the curry.
  • Enjoy with rice or rotis.

Thrissur Special Kozhi Kumbalanga curry

With the pandemic showing no signs of letting up, any dream of packing bags and going for that long overdue holiday remain remote. My Google Map Timeline seems to quizzically ask why I am stuck in just one place, Thrissur, all these months. But not one to concede defeat I conjure up an interesting plan to explore the town we are in. So come morning we, husband and I, don our walking tracks and boots and jump right into our car. The car gets parked in a new area every day and we are ready to embark on our adventure trek through the winding narrow lanes which sometimes go steep down or up into areas filled with lush green trees and pretty little houses. Our tryst with nature invigorates and on some days we are lucky to spot a bright blue breasted kingfisher flying past or a green haze of parrots cackling on the coconut tree high up. But then we have our not so pleasant experiences too….like a sudden aggressive growl from behind a house gate that literally make us hop, skip and jump in unison or the grandly named Ford John street after a few yards ahead petering into a narrow marshy and squidgy path. But these one hour walks have helped us gain info about Thrissurians….we can name our house ‘Glen view’ even when the row houses opposite do not promise any view of that sort and Fashion street in a sleepy area of town has nothing fashionable whatsoever.

With Thrissur as the central theme, its specialty cuisine also cannot be far behind. Daily conversations with friends around revolve around food; what with most of the restaurants and eateries closed any new recipe passed on is immediately given a try. So when I told my friend how my neighbor has grown a bheeman/giant Kumbalanga/ashgourd and has been kind to give us a big chunk of it, she quickly snapped her finger and said…try the Kozhi kumbalanga curry. Everything happened in a flash right after…going over her recipe in my head, I went straight to the kitchen. There was a bit of screwing up of nose by the husband on seeing the big chunks of Kumbalanga sitting with the chicken which I ignored. Half an hour later out came the drool-worthy curry to the dining table with puffy chapatis all of which vanished in the matter of a few minutes.

This is one curry you can make when you have just about a little bit of chicken left over in your freezer. Mildly flavoured with spices and made creamy with the addition of coconut milk, the curry’s taste is amply enhanced by the addition of large chunks of Kumbalanga. The gourd pieces cook silky soft, taking on the delicious juices of the chicken and added spices, but hold their shape and don’t disintegrate into the curry. The curry goes well with rice, pulavs, rotis and porottas. And the best part is making it is just child’s play!

Ingredients

Chicken pieces : 1/2 kg, cut into medium pieces.

Kumbalanga/ashgourd : 1/2 kg, peel the skin and cut into big chunks.

Coconut milk extracted from 1 cup of grated coconut : 1 cup of thin milk and 1/2 cup of thick milk. Run the grated coconut with a little warm water and strain to extract 1/2 cup thick milk and again with some more warm water to get 1 cup thin milk. Or you can substitute with ready made coconut powder. Mix 2tblesp of powder to 1 cup of warm water to get thin milk. Mix 2 tblesp of powder with 1/2 cup of warm water to get thick milk.

Onion : 1 medium, sliced.

Garlic : 6 flakes, crushed.

Ginger : 1 and1/2 inch pc, crushed.

Green chilli : 2, crushed.

Tomato : 1, cut small.

Turmeric pdr : 1/2 tsp.

Coriander pdr : 2 tblesp.

Kashmiri chilli pdr : 1 tblsp + 1/2 tsp for tempering in the end.

Garam masala pdr : 1 tsp.

Shallots : 5-6,sliced thin or sliced pieces should be 3 tblesp.

Red chilli whole : 1-2 cut into strips.

Salt to taste and coconut oil to cook.

Method

keep all ingredients ready and keep a heavy saucepan on medium heat. I have used an earthen pan to cook the curry.

Pour 3 tblesp of coconut oil and add the crushed garlic, ginger and green chilli.

Saute on mild heat till the mixture is fragrant and start to just brown.

Now add the sliced onions and saute till the onions turn brown at the edges.

Add the turmeric, coriander redchilli and garam masala powders and saute on very low heat for 2-3 minutes, careful not to allow the mixture to burn.

Now keep the heat to low and add the chopped tomato. Give a nice stir and close the lid and allow the tomato to incorporate into the mixture.

Once you see the mixture pulpy, add the chicken pieces and stir well and saute for 5-6 mts .

Add the gourd pieces and saute for another 2-3 mts.

Add the thin coconut milk and salt and give a stir and close lid and allow to cook till the chicken and gourd pieces are all well cooked.

Now add the thick coconut milk. Taste and adjust salt and once the curry just start to boil, take off the gas.

In a separate heavy bottomed kadhai , add 2 tsp coconut oil and saute shallots and red chilli strips till the shallots turn brown.

Turn the heat to its lowest and add the 1/2 tsp kashmiri chilli pdr. Saute for just half a minute till it is fragrant. Do not allow the chilli to burn.

Add this to the curry. Tasty Kozhi Kumbalanga curry is ready.

Sabudana/Tapioca Pearls Vada

A quick scan of my morning paper threw up an interesting piece of news….during the pandemic when economies around the world including ours is plummeting, one business is booming in India….the business of making kites. Quite understandable, I guess… it does tell something about our indomitable spirit and our yearning to break free of the iron shackles which have bound us home in the times of the Corona. People are going by the droves to their terraces with their colourful little kites and as the little kites lift and soar in the skies, it gives the joy and relief of complete freedom. The unexpected lottery struck by the kite makers are making them dole out more and more innovative kites and they are just happy to work round the clock to meet the mounting orders…and mind you, those orders are not only from within the country , but from our neighbor Pakistan!

The kite story takes me all the way to Gujarat, where we were posted for some years near Ahmedabad. January 14th …Makar Sankranti is officially celebrated as the Kite Festival. Come daybreak and the cloudless skies would be dotted by kites, big and small. Soon the entire skyline would be dotted by kites of all possible colours. Everyone would be out of their homes…either in the open squares or their terraces with eyes only for their respective kites…needless to say it would be a very busy day for the police and safety force as some in their excitement would fall off balconies and terraces too.

When everyone is outdoors, finger food rules. Huge platters of Sabudana vadas and Khaman Dhoklas do the rounds and as the platters circulate, hands grab them in twos and threes to be immediately stuffed in the mouth, lest the attention to your soaring kite suffers. Those who have nothing to do but enjoy the scene, like me, get to enjoy the taste of these delicious vadas. Sabudana vadas are so easy to make….it’s just the mixture of perfectly soaked tapioca pearls mixed with peanut, ginger, chilli and some boiled potatoes, but in their fried golden avatar they are delectably crunchy on the outside with a sweet and soft chewy inside which is indeed satisfying. Being a Keralite, this was a new item for me…for apart from the lentil ones like parippuvada and the uzhunnu vada, nobody back home seemed to know that there can be a vada made of tapioca pearls….so given the first opportunity to impress, out came a steaming platter of golden sabudana vadas from my Kerala  kitchen and then it was my turn to demurely bat my eyelids and sport a winning smile to all the aah and oohs given!

Ingredients

Sabudana/ Tapioca pearls : 1/2 cup. Wash the sabudana 3-4 times in running water. Now soak it in a cupful water for 4-5 hrs. After they are perfectly soaked (test it by slightly crushing one. It should be easily sqidged.) strain it and keep the strainer on a bowl to drain out excess water for about an hr.

Peanuts : 1/2 cup, dry roast with skin in a mildly heated pan for a few minutes and run in mixi/blender for a second to mildly crush them.

Potatoes : 2 medium, boiled and crushed.

Ginger : 1 inch piece.

Green Chilli : 1

Green coriander : a few sprigs, chopped.

Salt to taste and Oil to fry.

Lime : 1/2, take juice.

Method

Boil potatoes and crush them with your palms.

Coarsely grind together ginger and green chilli.

Roast peanuts with skins on over mild flame in a dry heavy based pan. Run for a second in a blender to coarsely crush. Let some remain half broken or even whole.

In a big plate place the strained Sabudana, potatoes, ground ginger-chilli paste, crushed ground nuts,chopped coriander, salt and the juice of 1/2 lemon.

Mix everything well to get a tight mixture.

Take lime sized balls and shape into flat discs which are thin at the edges and slightly thicker in the middle. If your vadas are very thick in the middle they won’t cook well.

Fry vadas in batches in moderately hot till they are golden and crisp. Remove to a bowl lined with paper tissue.

Enjoy your vadas with mint chutney or tomato ketchup.

Onam Special Sharkara Upperi

IMG_20200830_212529_347 (1)

An Onam sans the crescendo of ‘Arappue’ calls, ten whole days of competitive  floral carpets at home entrances, the fun and the frolic of being one with the swelling crowd in Onam markets, the deafening drums and swaying painted ‘Pulis’ on the roads….all seems unreal to any Malayali. But sadly as the pandemic progresses, ruthlessly casting its deadly tentacles on more and more hapless people, our festivities shrink as shared gatherings and lunches become no longer a possibility. But who said that the virus can punch a hole in the Malayali spirit? No flowers from outside the state this time?….Oh yes, we can manage with our own local ones. The long forgotten thumbappo and Kashithumba  rule in this year’s Pookkalam. Ban on the painted tigers taking over Thrissur streets on 4th day of Onam?….No worries …they’re going online in a big way and the whole world can see them jiggle their massive painted tiger faces live. And instead of depending on outside caterers for the delicious Onam sadya, many are trying a hand at preparing it at home.

For me Onam centres around the heavenly smells of fresh banana chips and Sarkara upperi being made in the outdoor kitchen of our ancestral house. Huge aluminium dabbas of ‘kaya varuthathu’ and Sharkara upperi would be stacked up in the kitchen cabinets. And there would be a continuous flow of kids and adults towards them…some tipping chips straight into folds of skirts, others confiscating entire dabbas and running to the attic where game of cards would be on.

Making of the Sharkara upperi is a bit tricky, is what I found out when I attempted to make at home. The chips are to be cut thicker, which would mean they should fry longer in oil to get them absolutely crisp. Managing the heat of the oil is the trump card to get them fried crisp and golden and not ending up like burnt wood bits. The consistency of the jaggery syrup is the next danger point. Get the viscosity right and the rest that happens is quick and magical. A few turns with a flat ladle after you empty the entire upperi into the syrup and you see the molten liquid coating transforming into a sugary powdery even coating on each upperi piece.

I am proud of myself each time I come up with a winner of a Sharkara upperi. These are our traditional recipes and these will last only through the interest and  passionate will to experiment these delicacies in our own kitchens. One may find umpteen packets of Sharkara upperi in bakeries and stores…but nothing stands close to the homemade ones, I’m sure.

Ingredients

Green Nendran banana : 10. Gently remove the skin and cut into 1 cm thick upperi shapes.

Jaggery : 350gms,. In a sauce pan add half a cup of water and cook on low heat to melt into a syrup.

Jeera : 50 gms.

Dry ginger : 50 gms.

Sugar : 2 tblesp.

Ghee : 2 tblesp.

Coconut oil to fry

Method

IMG20190905083320 IMG20190905084704 IMG20190905085619 IMG20190905094145

  • Mildly dry roast jeera and dry ginger and powder in a mixi jar.
  • Heat the oil in a wide and heavy based kadhai to smoking hot. 
  • Add the cut banana chips ( a cup full) and fry for 2 minutes in high heat.
  • Now lower the heat and continue frying till the chips are golden and produces clanging sounds as the ladle touches them. You may take one out and check if it is perfectly done and breaks with a crack and is really crunchy as you bite.
  • Take them out of the oil and store on a tissue lined plate.
  • Again bring the oil to smoking hot and repeat the frying process till all your chips are fried.

IMG20190905095931  IMG20190905100049

  • Take a heavy bottomed wide mouthed vessel. Keep on gas and add the strained jaggery syrup into it.
  • Now cook the jaggery syrup till you see a clear partition as you run the ladle through the centre of the syrup.

IMG20190905100423  IMG20190905100121  IMG20190905100554


  • Add all of the fried chips in and quickly mix well into the syrup.
  • Add the powdered jeera ginger mix, the sugar and the ghee. 
  • Continue mixing and you will see the syrup solidifying around the chips and coating them as dry powder.
  • Tasty Sharkara Upperi is ready. Enjoy!